
Waterproofing your basement foundation from the inside is vital for preventing moisture issues and protecting your home. Start by evaluating any leaks or damp spots, as these could indicate larger problems. You’ll need to gather specific materials and tools for the job. Knowing how to effectively seal cracks and apply waterproofing products can make a significant difference. Let’s explore the essential steps to guarantee your basement remains dry and healthy for years to come.
Key Takeaways
- Identify and assess any water leaks, damp spots, or mold around your basement to determine specific waterproofing needs.
- Prepare the space by clearing debris, enhancing ventilation, and inspecting drainage systems for proper flow.
- Seal cracks and gaps using high-quality epoxy or polyurethane sealants, ensuring a smooth surface for effective moisture protection.
- Apply suitable waterproofing products, such as sealants or membranes, following manufacturer guidelines for optimal results.
- Implement long-term maintenance practices, including regular checks and mold prevention strategies, to ensure ongoing protection against moisture.
Assessing Your Basement’s Waterproofing Needs
How can you determine if your basement needs waterproofing? Start by identifying water leaks around windows, pipes, and foundation walls.
Look for damp spots, mold, or mildew, which indicate moisture issues. Next, assess humidity levels using a hygrometer; ideally, they should stay below 60%. If you notice high humidity or condensation on walls, it’s a sign of inadequate ventilation or water intrusion.
Pay attention to seasonal changes; heavy rain or snowmelt can exacerbate problems. By combining these observations, you can effectively evaluate your basement’s waterproofing needs and decide on the necessary steps to protect your home from water damage.
Gathering Essential Materials and Tools
Before you start waterproofing your basement, it’s essential to gather the right materials and tools to guarantee a successful project.
First, you’ll need essential tools like a paint roller, brush, and a trowel for applying waterproofing materials. Don’t forget a utility knife for cutting materials and a bucket for mixing.
For waterproofing, choose high-quality products such as sealants, membranes, or paints specifically designed for basements. A moisture meter can help you assess humidity levels too.
Finally, gather safety gear like gloves and goggles to protect yourself during the process. With these essentials, you’re ready to proceed confidently.
Preparing the Basement for Waterproofing
With your materials and tools gathered, it’s time to prepare your basement for waterproofing. Start by organizing your basement; remove any clutter and store items in waterproof bins to enhance moisture control. Check for any signs of water damage and guarantee adequate ventilation.
| Task | Purpose | Tips |
|---|---|---|
| Clear the area | Improve accessibility | Use waterproof storage |
| Inspect for damage | Identify issues | Look for mold or rot |
| Enhance ventilation | Reduce humidity | Open windows or use fans |
| Check drainage systems | Guarantee proper flow | Clear gutters and drains |
Following these steps will set a solid foundation for effective waterproofing.
Sealing Cracks and Gaps
Sealing cracks and gaps is an essential step in waterproofing your basement foundation, as even small openings can allow moisture to seep through.
Start by inspecting your walls and floor for any visible cracks or gaps. For crack sealing, use a high-quality epoxy or polyurethane sealant, guaranteeing you fill the entire crack to prevent water entry.
Inspect your basement walls and floor for cracks; seal them with high-quality epoxy or polyurethane to prevent water infiltration.
For gap filling, apply a suitable expanding foam or caulk to any larger openings, especially around pipes and joints. Smooth the surface to guarantee a proper seal.
Allow the materials to cure as per the manufacturer’s instructions, providing a solid barrier against moisture intrusion.
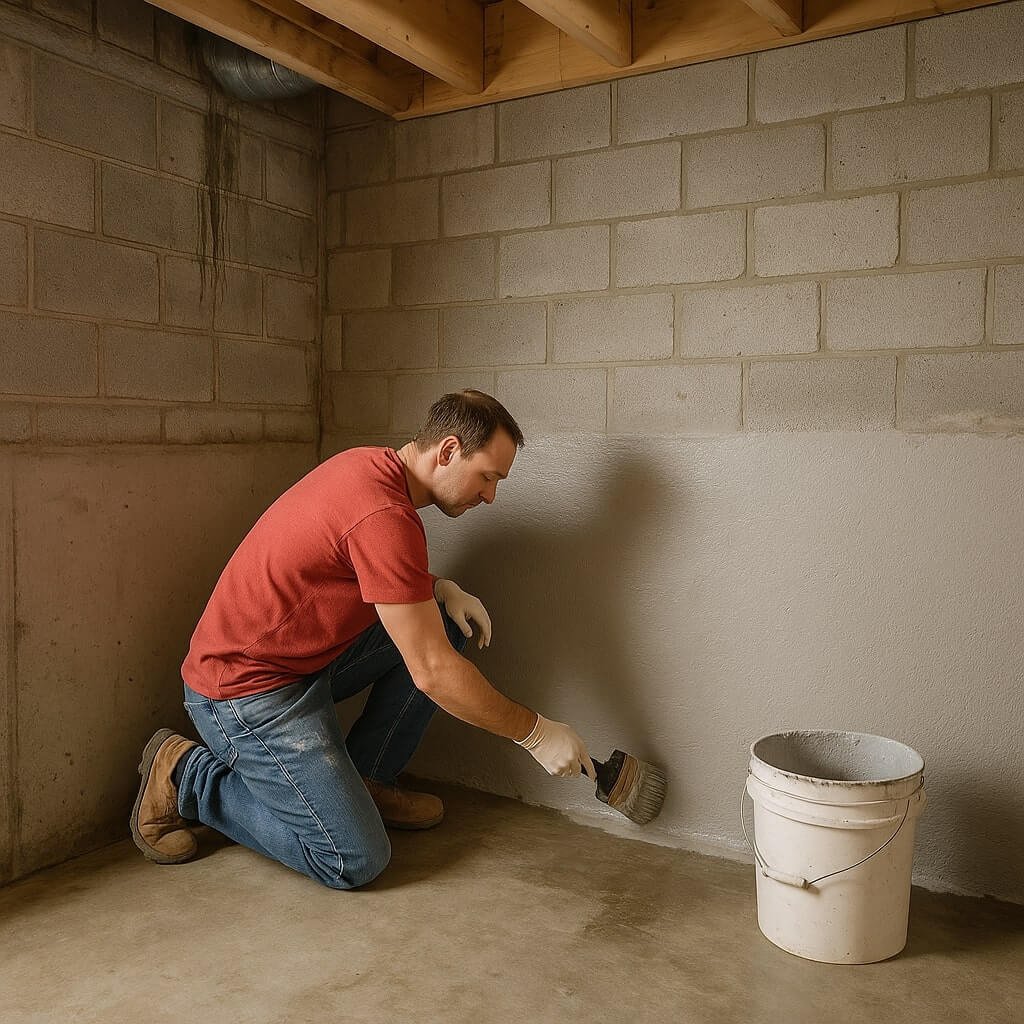
Applying Waterproofing Paint or Membrane
Before applying waterproofing paint or membrane, you’ll need to guarantee the surface is properly prepared.
Choosing the right product is vital for effectiveness, so consider your specific needs and environmental factors.
Finally, familiarize yourself with the application techniques to achieve a durable, watertight seal.
Surface Preparation Steps
Proper surface preparation is essential for achieving effective waterproofing in your basement foundation.
Start with thorough surface cleaning; remove dirt, dust, and any loose debris. Use a wire brush or pressure washer for tough spots.
Once the surface is clean, allow it to dry completely before moving forward.
Next, apply a suitable surface priming product. This step enhances adhesion and guarantees the waterproofing paint or membrane bonds effectively to the foundation.
Follow the manufacturer’s instructions for the primer to achieve ideal results.
Properly prepared surfaces lead to a durable waterproof barrier, preventing moisture intrusion in your basement.
Choosing the Right Product
How do you guarantee your basement stays dry? Start by choosing the right waterproofing product.
Conduct a product comparison between waterproofing paints and membranes. Paints are easier to apply and suitable for minor moisture issues, while membranes offer superior protection against heavy leaks.
Consider application methods; some products require brushes, while others may need rollers or sprayers. Look for products with high mold resistance and durability.
Also, check the manufacturer’s guidelines to verify compatibility with your prepared surface. By selecting the right product based on your specific needs, you’ll effectively safeguard your basement from water intrusion.
Application Techniques Explained
Choosing the right waterproofing product sets the stage for effective application techniques that secure your basement’s protection.
Whether you opt for paint or a membrane, mastering these methods guarantees long-lasting results:
- Surface Preparation: Clean and dry the area to remove dirt and moisture.
- Application Method: Use a roller or brush for paint; apply membrane with a trowel or spray.
- Curing Time: Allow adequate drying time between coats for best adhesion.
Installing Interior Drainage Systems
While basement waterproofing may seem challenging, installing an interior drainage system can effectively manage water intrusion and protect your foundation.
Start by excavating the perimeter of your basement to install drainage tiles, making sure they’re positioned below the foundation’s footer. These tiles will collect water and direct it toward your sump pump.
Next, install the sump pump in a designated pit to efficiently remove water from the basement. Cover the drainage tiles with gravel for best flow, and seal the excavation with concrete.
Regularly check your sump pump to make certain it operates effectively, maintaining a dry and safe basement environment.
Ensuring Proper Ventilation
Proper ventilation is essential for maintaining a healthy basement environment and preventing moisture buildup.
You’ll need to take into account various ventilation system options, including passive vents and mechanical systems, to guarantee adequate airflow.
Importance of Airflow
Ensuring adequate airflow in your basement is essential for maintaining a healthy environment and preventing moisture buildup.
Proper ventilation directly impacts air quality and enhances moisture control. Here are key benefits of airflow:
- Reduces humidity levels, minimizing mold and mildew growth
- Promotes the circulation of fresh air, improving overall comfort
- Helps maintain structural integrity by preventing wood rot and corrosion
Ventilation System Options
To maintain ideal airflow in your basement, selecting the right ventilation system is key. Proper air circulation helps prevent moisture buildup and improves air quality. Here are some common ventilation systems to take into account:
| System Type | Benefits |
|---|---|
| Passive Ventilation | Cost-effective, no energy use |
| Mechanical Ventilation | Improved control, consistent air flow |
| Dehumidifiers | Reduces humidity, enhances comfort |
Evaluate each option based on your basement’s size and needs. By investing in an appropriate ventilation system, you’ll guarantee a healthier, drier environment that complements your waterproofing efforts.
Maintaining Your Waterproofed Basement
While a waterproofed basement offers protection against moisture, regular maintenance is essential to confirm its continued effectiveness.
To guarantee your basement remains dry and free from mold, follow these key strategies:
- Implement humidity control measures by using dehumidifiers and ensuring proper ventilation.
- Regularly inspect for cracks or signs of water intrusion, addressing any issues promptly.
- Use mold prevention strategies, such as mold-resistant paints and cleaning solutions, to keep surfaces safe.
Conclusion
By following these steps, you can effectively waterproof your basement foundation from the inside, protecting it from moisture and potential damage. Regularly check for leaks and monitor humidity levels to maintain a dry environment. Remember, proper preparation and the right materials are essential for success. With consistent maintenance, your waterproofing efforts will guarantee a safe, healthy basement for years to come, safeguarding your home and its value against water-related issues.